
![]()
In this tutorial we will show you how to install Open VPN on a CentOS 6 VPS Server. OpenVPN is an open source VPN Server that can be used for creating secure point-to-point Virtual private Networks.
We will setup a VPN Server and use it to route traffic from connected clients out to the internet. Using this configuration we can browse the web or run Netflix through our VPS. This is a great way to get around firewalls that block IP’s at a country level.
The First thing you will need is a VPS. You can get a high performance VPS from Zoomcloud.net for only 9.99 a month. And we highly recommend them.
Once you have your VPS up and running, the next thing you will need is to install the Extra Packages for Enterprise Linux, aka EPEL repository.
At the time of this writeup, the current version of Epel is 6.8. We will use wget to grab the rpm from a mirror.
wget http://mirror.pnl.gov/epel/6/i386/epel-release-6-8.noarch.rpm
Now that we have the RPM you need to install it.
yum install epel-release-6-8.noarch.rpm
Since you have installed the EPEL repository, you will be able to use YUM to install the openvpn packages and required dependancies.
yum install openvpn
OpenVPN is now installed but there are a few more configuration tasks we need to complete before its usable.
Configuring OpenVPN on CentOS 6
You will need to create a configuration file for the OpenVPN server to use as well as create some certificates. In this tutorial, we will use self signed certificates, but you can and should use proper certificates in production environments. For small installations, self signed certificates will suffice.
Lastly you will need to configure ipforwarding for your VPN traffic and permit that traffic through your IPTables firewall.
Create OpenVPN Server Configuration File
Open VPN comes with a sample configuration. We will use this as a basic template then modify it to suit our requirements. You need to copy the sample config file to OpenVPN’s directory in /etc.
cp /usr/share/doc/openvpn-2.3.2/sample/sample-config-files/server.conf /etc/openvpn/

cd /etc/openvpn/
Next we will need to edit the configuration file to configure OpenVPN for what we are trying to do. Using vi edit the file you copied to /etc/openvpn/server.conf
vi server.conf
I recommend running VPN over TCP. You may experience better performance over UDP as its “connectionless”, but as I will be sending data over this connection that I rely on I want a connection oriented protocol. This will also stop UDP flooding of the VPS Server. Comment out the ‘proto udp’ line and uncomment the ‘pro to tcp’ line.
# TCP or UDP server?

proto tcp

;proto udp
Next we need to force all of our traffic up the VPN connection from our connected clients. You can configure split tunneling which would allow connectivity to your lan as well resources over the VPN connection but we will cover that in another tutorial. For now uncomment the following line in server.conf
push redirect-gateway def1 bypass-dhcp
Additionally we will need to “push” what DNS server the client should use. Since all traffic will be routed up the VPN tunnel, clients would not be able to reach the local pan DNS resolver (usually their cable modem or router), so we need to provide a replacement. We will tell our users to query OpenDNS’s dns servers for queries. Uncomment the following two lines from server.conf.
push 'dhcp-option DNS 208.67.222.222'

push 'dhcp-option DNS 208.67.220.220'
Lastly, we also need to tell OpenVPN What CA, Certificate, Key and Diffie–Hellman key to use. Modify these lines so they look like below, modifying for your key and certificate names.
ca /etc/openvpn/easy/keys/ca.crt

cert /etc/openvpn/easy/keys/vpn.something.com.crt

key /etc/openvpn/easy/keys/vpn.something.com.key # This file should be kept secret
# Diffie hellman parameters.
# Generate your own with:
# openssl dhparam -out dh1024.pem 1024
# Substitute 2048 for 1024 if you are using
# 2048 bit keys.
dh /etc/openvpn/easy/keys/dh2048.pem
Save and exit the configuration file server.conf. That is all we need to edit. Since we used the sample config file all the other settings should work for us.
Setting up Certificates using easy-rsa
Now that the configuration file is updated we need to create certificates for the OpenVPN Server and our client to use. We will use easy-rsa to generate a CA, key, and self signed certificate and our users certificates. Easy-rsa is also available from the EPEL repo. We need to use YUM again to install the easy-rsa package.
yum install easy-rsa
Next we need to create the CA, Certificate and Key. You will need to copy some more sample file over first like we did above. Easy-rsa provides these files in /usr/share/easy-rsa/2.0 on CentOS 6, but on other distributions it may be in another location.
mkdir -p /etc/openvpn/easy/keys

cd /usr/share/easy-rsa/2.0

cp -r * /etc/openvpn/easy/

cd /etc/openvpn/easy/
Now you need to edit the file “vars”. Easy-rsa uses this file to get defaults for the keys your going to use.
I recommend you use a 2048 bit key size or greater. 4096 may be overkill right now but if your paranoid use 4096. To balance speed and security use 2048. Do not use a 1024 bit key. These can be cracked.
Modify the line that says export KEY_SIZE=1024 to look like this:
export KEY_SIZE=2048
Also modify all variables at bottom of the vars file. These are the default values for fields which will be placed in the certificate. Don’t leave any of these fields blank. Make your look something like this.
export KEY_COUNTRY="Your Country"

export KEY_PROVINCE="Your State"

export KEY_CITY="Your City"

export KEY_ORG="Your ORG"

export KEY_EMAIL='[email protected]'

export KEY_CN=OpenVPN-CA

export KEY_NAME=OpenVPN-CA

export KEY_OU=""
Save and exit the file (:wq if your using vi) and then you need to source the vars file to set the options as environment variables. When you source the file make sure you follow the correct syntax if your unfamiliar with this. The syntax is “. ./vars”, Notice the preceding dot.
. ./vars
If you make a mistake you can unset the variable by running the following command, then edit vars and source it again.
unset variable_name;
Next you need to make sure the environment is clean before setting up your first CA. Run the following command to clean the /etc/openvpn/easy/keys directory of any existing keys. ***NOTE*** You only need to clean before creating your first key. Do not run clean again after creating your CA or you will delete it and any keys signed by it.
./clean-all
Creating the Server CA Certificate and Key
Now that the environment is setup for easy-rsa we can create the CA for OpenVPN to use by running the following command:
./build-ca
Next we need to create the key for the OpenVPN Server to use.
./build-key-server vpn.something.com
Lastly we need to generate our DH key.
./build-dh
Creating a client certificate
Open VPN Uses certificates for authentication. You will need to create a certificate and key for each client to use and then provide it to them.
./build-key clientname
Now you need to provide the Server CA, and the Client Certificate and Key. I usually gzip these and then email the gzip file to the client. We will use this file when we setup our client later in this tutorial.
tar zcvf tutor-vpn.tgz ca.crt clientname.crt clientname.key

echo "YourVPN Certificate is attached" | mailx -s "Your VPN Certificate" -a tutor-vpn.tgz [email protected]
Configure IPTables for OpenVPN
Now we need to tell IPTables to NAT the OpenVPN Client traffic and send it out our default ethernet interface which on this system is eth0. We also need to permit our OpenVPN traffic to the VPN server. We will need to open up the port TCP 1194, as we configured this OpenVPN Server to use TCP.
iptables -A INPUT -m tcp -p tcp --dport 1194 -j ACCEPT

iptables -t nat -A POSTROUTING -s 10.8.0.0/24 -o eth0 -j MASQUERADE

service iptables save
Configure Kernel Networking
In additon to setting up IPTables, we need to tell the linux kernel to forward IP 4 traffic. You can do this by editing the following line in that reads “net.ipv4.ip_forward = 0” in /etc/sysctl.conf to look like this:
# Controls IP packet forwarding

net.ipv4.ip_forward =1
To make these setting active you need to update sysctl.
sysctl -p
Starting Open VPN
The configuration on the server is complete at this point. All that is left to do is start OpenVPN. Additionally if you want the OpenVPN server to start automatically when your server is rebooted you can set it using chkconfig.
service openvpn start

chkconfig openvpn on
Configuring the Open VPN Client
Now that your server is all setup, you need to setup the clients computer to connect to the new server. In our case we a MacBook Pro running OSX Mavericks. There is an awesome Mac OpenVPN Client called Viscosity that we really enjoy using. They have a free version you can use for 30 days, and to be honest the purchase price for the client is a very reasonable $9 USD.
The client will need the IP address or Fully Qualified Hostname of the VPN Server and the file you emailed them earlier.
Extracting the key and certificate
The client can simply click on the tgz file you emailed them and extract it using OSX’s building archive utility. Or you can do it from a command prompt as well. This will extract the three files the client will need when setting up their VPN Connection.
tar xvf tutor.tgz
Configuring the Viscosity OpenVPN Client
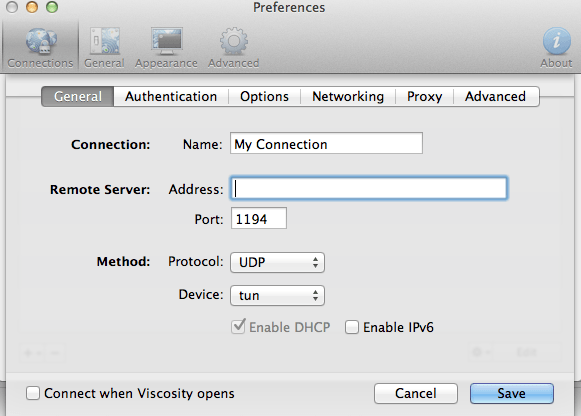
Next open Viscosity and then click the Viscosity icon in the menu bar and click “Preferences”. This will Open up the connection Window.

Click the + icon and then click “New Connection”. This will open the configuration window where the client can configure the IP Address or Hostname of the Server. Leave everything else on this page as the defaults.
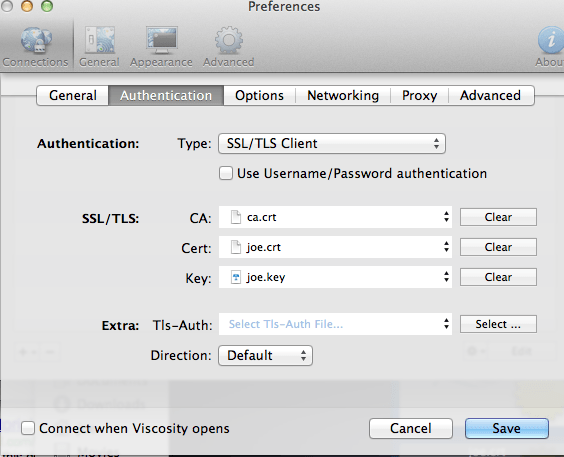
Now Click the Authentication tab, and configure the Server CA, Client Key and Certificate and then click save.
Now Click the Viscosity Icon in the menu bar and you should see an option that says Connect My Connection. Click this to connect to your VPN.
After you are connected, all your traffic is being routed up the tunnel so your source address will look like your servers IP address. To confirm, simply go to google.com and ask what is my IP and it will tell you. You should see your Servers IP address.
Thats all there is to setting up OpenVPN on CentOS 6. We hope you have enjoyed this tutorial. Please leave comments if you have any questions or suggestions!
-Tutor
Leave a Reply to hamed Cancel reply